Description
$15 flat rate shipping for Dryzone
1-2 Days Adelaide
2-3 Days Sydney and Melbourne
3-4 Days Brisbane
5-6 Days Perth
Regional areas may vary
Application instructions for D.I.Y.
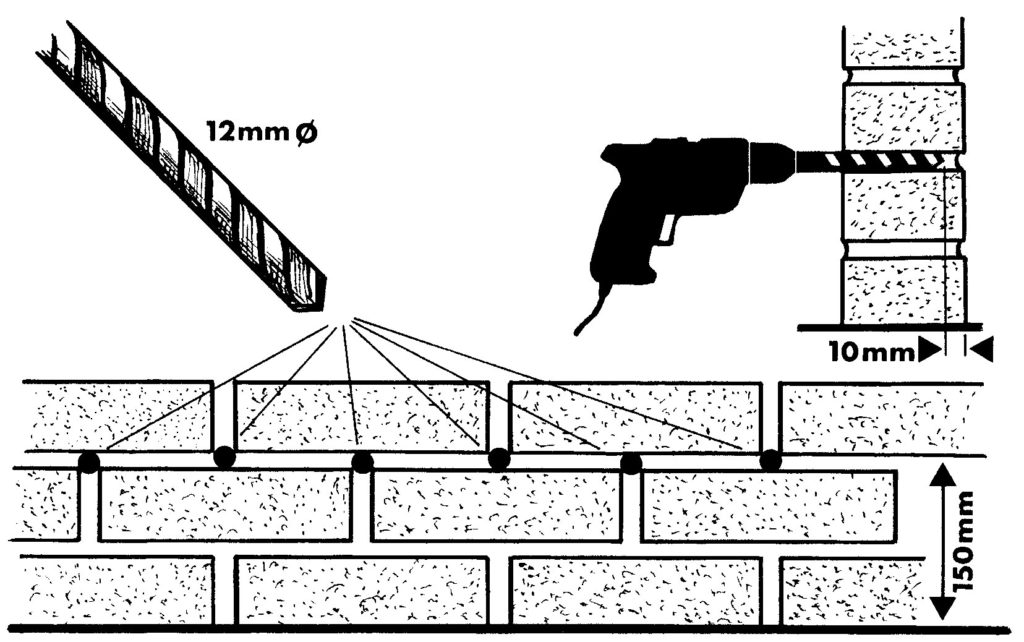 Using a rotary hammer drill with a 12mm masonry bit, drill within 10mm of the total wall thickness. We recommend using either a depth gauge or mark the bit with a white out pen (tape tends to move as the drill bit gets hot). Drill horizontal holes at 110mm centers’ along lowest mortar course at least 150mm above floor or ground level. Dryzone will penetrate bricks and stone therefore if you cannot follow a mortar course it will not affect the efficiency of the treatment. Double brick cavity walls can be treated from one side only simply by drilling across the cavity and injecting into both walls separately making sure you do not inject whilst crossing the cavity with the nozzle.
- Remove nozzle end cap from application gun (1) and fully retract the plunger whilst depressing the release catch (2). Insert the Dryzone tube and make a clean cut in the end with either a sharp knife or scissors (3). Making sure that the end of the tube is not protruding replace the nozzle end cap (4). Prime gun by gently squeezing the trigger until Dryzone cream is evident at the end of the nozzle (5).

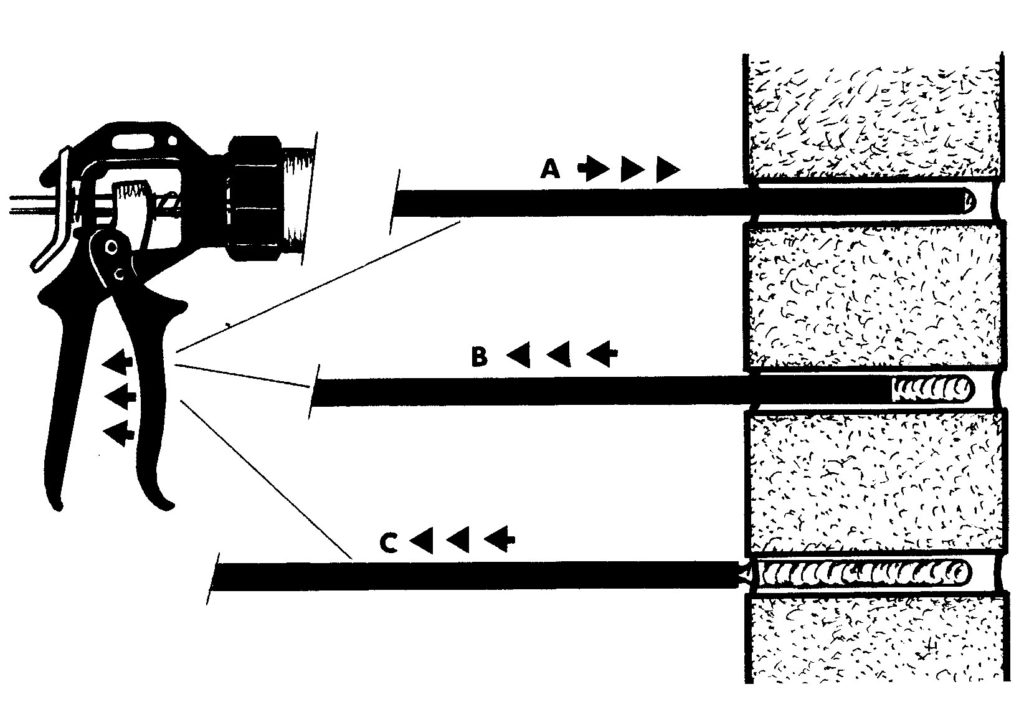 Ensuring that the hole is free from rubble insert nozzle to the full depth (A). Gently squeeze the trigger whilst slowly withdrawing the nozzle (B). Stop injecting before the end of the nozzle is fully withdrawn from the hole (C). One full squeeze of the trigger will insert
sufficient Dryzone to fill approx.100mm depth hole.
Please do not hesitate to call 0402 278 053 if you have any questions regarding
these instructions or need any further advice.
It is advisable to:
- protect carpets from brick/mortar dust by laying plastic sheeting or other protection before commencing drilling.
- have your drill lead connected to a safety trip box especially when drilling near any power point in the wall.
- be aware of water pipes when drilling near bathrooms or any wall which may have water pipes in them. It is advisable to turn off the water at the main tap if there is a risk of hitting a water pipe.
- clean up any brick/mortar dust before injecting the Dryzone.
- wear gloves and wash hands with soap and water if in contact with Dryzone.
Replastering
When replastering internal walls it is essential that you or your plasterer follow these instructions to minimize the risk of any residual moisture remaining in the walls affecting the new plaster.
- It is recommended to leave existing render on walls for at least six months to act as a sacrificial poultice to help draw out residual moisture remaining in the walls above the Dryzone Treatment and then remove render to a height of at least 100mm above all affected render.
- Render with 3-4 parts renderers sand with 1 part cement (do not add lime). Add Aftek Number 2 Paste moisture barrier to water prior to mixing as per manufacturer’s specifications detailed on the container. Additional Number 2 Paste can be added to the render mix as a plasticiser (ie. make the mix more workable.)
Usage Chart for Dryzone (600ml tubes)
| Wall depth | 4½” (110mm) | 9″ (220mm) | 13½” (330mm) | 18″ (440mm) |
| Length of Wall |
||||
| 10m |
2.0 | 4.0 | 6.6 | 8.8 |
Note: different site conditions may cause slight variations. Allow an extra 10% when estimating.
Please do not hesitate to please call 0402 278 053 if you have any questions regarding these instructions or need any further advice.
* Refundable Nozzle: For a full refund on the nozzle, please wash and return to us. For more information on where to send the nozzle and how the refund will be processed, please call 0402 278 053.
